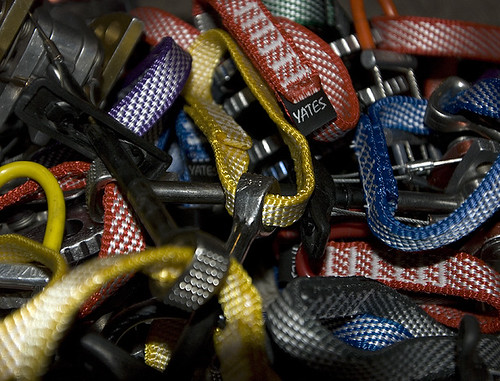
Camping in Style with an RV Trailer

August 22, 2012 at 9:31 am

You may ask yourself, what is that beautiful house?
You may ask yourself, where does that highway lead to?
You may ask yourself, am I right, am I wrong?
You may say to yourself, my God, what have I done?

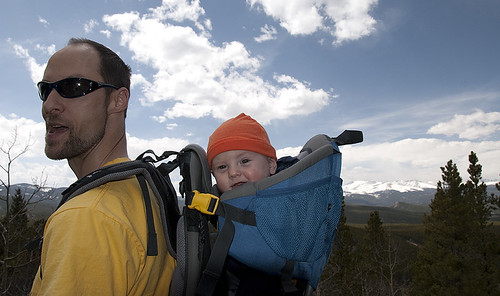
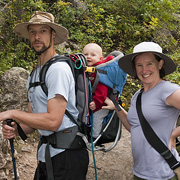
First camping trip at 5 months old

I’m sure when David Byrne wrote those lyrics, he was considering much headier subjects than camping. But I think they apply to any transitional period of life, and our transition from tent-camping non-parents to RV-owning parents was just as crazy as any.

A new definition for “camping” in March 2011

I can remember the days when I thought RV’s were just for rednecks. I remember my mom scoffing with indignation at my dad’s proposal that they might buy an RV when he retired. And I can remember that first trip when our friends Dylan and Ann brought their camper up to Vedauwoo, and I loved it so much.

A few years later, and Mark and I were camped for a weekend in the desert in January. We both realized we were facing a choice. Once we had a baby on board, we would either have to give up these clear, cold nights in the desert or upgrade to a camper. Neither one of us thought it was a good idea to try to keep a little kid warm in a tent on one of those long, frigid Shelf Road nights. But we weren’t sure what we wanted to do instead.

Camping at Shelf Road, CO (May 2011)

We talked about camper vans, as we had seen some really great Eurovans at climbing areas around the country. But these had a few problems for us. One was the price; we would have to sell one car to buy the camper van, which meant that Mark would be driving it daily to work. The second was seating; most of these vans have only one bench in the far back (if they have a kitchen), and this would make road trips with a kiddo (or two) tricky. And finally, we knew climbing areas often have camping distant from the trailhead. So a camper van would have to be packed up each morning and driven to the climbing.

Camping in Vedauwoo, WY (June 2011)

A trailer just made more sense for us. We could tow it with Mark’s truck, which had plenty of seating, and we could leave it at the campsite when we went climbing. But even once we decided on a trailer, there were lots of choices. Should we buy a pop-up? They are often the least expensive, but we felt that the wild winds of Wyoming would make any trailer with tent sides an uncomfortable place. So, we needed the smallest trailer we could find, that would sleep at least three, and had all hard sides. And wouldn’t break the bank.

Camping at Moraine Park in RMNP (June 2012)

We found it on my first trip out, of course. I presented my long list of criteria to a salesperson who looked at me incredulously and then showed me a brand-new Jay Feather Sport. While JayCo doesn’t seem to make this particular model anymore, we think it’s perfect for us. At only 18ft long, we can fit into almost any tent site. It is light enough to tow with a V6, and sleeps 3 people separately from the dining area.

Camping at Glacier Basin in RMNP (June 2011)

There have been plenty of learning experiences since this purchase, but I love our camper. We learned that you can finance any RV with a long-term loan. So an inexpensive trailer like this one, and a 12 year loan, well, it works out to less than what we were spending on fancy tents and sleeping bags each year. And, these “mortgage” payments are actually tax deductible as a second home.

Camping at Dillon Reservoir, CO (August 2011)

There have been unexpected expenses, of course. We pay to store the trailer ($25 a month) and we pay to have it winterized and de-winterized each year. We have been lucky with maintenance, and so far only bought a new battery and a new propane tank (after the old one fell off on the interstate – exciting!) So it is more expensive than a tent, and it is harder to get to some of those off-road free campsites we used to frequent.

Camping in Vedauwoo, WY (second trip of May 2012)

But we have gotten out camping with our kiddo so much. We have taken him to all of our favorite local places, and on a week-long road trip with the Grandparents in this trailer. We have played inside during monsoon rainstorms, and spent chilly mornings with the furnace roaring and coffee on the stove. I nursed the baby on hot desert afternoons in that trailer, bounced him around to get him back to sleep on clear mountain nights, and snuggled up to read Dr Seus books with him over and over again.

Camping at Chambers Lake, Colorado (July 2012)

It may not be everybody’s style, but it’s definitely our style of camping… for now!

Letting the days go by, let the water hold me down
Letting the days go by, water flowing underground
Into the blue again, after the money’s gone
Once in a lifetime, water flowing underground

Same as it ever was, at Acorn Creek, CO (August 2011)

For more thoughts on styles of family camping, check out these other great posts:

Fold-up Camping Baby Gear Review

May 16, 2012 at 8:53 am

G’s Nana (Grandmother) has a secret super power. She has the amazing ability to locate the most unique fold-up camping baby gear that has ever been made. Some of this gear she bought for us, some of it we bought ourselves, all of it got tested out in real-world situations on our family camping trips over the last 18 months.

Hanging in the Go-Pod

KidCo Go-Pod
From the makers of the ubiquitous PeaPod, comes another fun piece of outdoor kid gear. The Go-Pod is a collapsable stand-up play area, with a seat for the kiddo, two cup holders, webbing attachment points for toys and a heavy-duty nylon floor below it. It does not have any springs or bouncy-ness to it, but it does have an adjustable height, and is rated for babies “from 4 months to walking.” The Go-Pod folds up into a bag about the same size and weight of a normal camp chair as well.

I liked that the chair had a floor below it, so baby need not be wearing shoes to play here. G really enjoyed putting things in the cup holders and generally messing around with the seat itself more than anything attached to it.

We did have a few issues, though. There is no support between the table-area and the seat, so the whole thing tends to sag down in the middle if the baby is not standing. When we first put G in there (around 5 months), the Go-Pod just seemed HUGE and it looked like it swallowed him whole! And since he was a pretty active kid, by the time he was crawling (10 months), he was not thrilled with being kept contained in the chair.

So, for us, the Go-Pod had a pretty short use-window. I stuck G in there this weekend for the photo (above) and while he did fit great, I got the “Get me out of here!” sign pretty quick. Looks like it’s time for our Go-Pod to move on to another camping baby!

Lucky Bums Moon Chair

Lucky Bums Moon Chair
For the first of I’m sure many small camping chairs for G, his Nana brought us Lucky Bum’s Moon Chair. This is a pretty cool little seat with a papason-like design. We actually had this in our living room for most of the spring, and we’ve gotten it out for G on our last two camping trips. It has a very sturdy ring around the seat, and folds up to about half the size of a normal camp chair.

Having Moon Chair Issues

However, even with all of the playtime G gives it, he still hasn’t figured out how to climb in and sit down with out the thing tipping over on him. If he wants to sit in this chair, we pretty much have to hold it in place while he climbs in. This could be a coordination issue, and I’m interested to see if he gets a hang of it later this summer. But the seat design is pretty inherently unstable, and might be better for older kids to relax in.

Ciao! Baby fold-up camp high chair

The Ciao! Baby Portable High-Chair
This is the most recent addition to our camping gear, and already I love it. The seat is sturdy, locks down with metal latches, and includes buckle straps to keep your kiddo in place. The tray area is covered in easy-to-clean plastic, and kept tightly in place, so seems to be able to support a decent amount of food. G had his breakfast al Fresco at our campsite last weekend, and he really dug this high chair.

G in the camping high-chair

This is just a well designed piece of fold-up camp furniture that I have been really amazed and impressed with. I have very little negative to say about it, except that it is the biggest and heaviest of the furniture when folded up (see comparison below) and is a bit expensive at $67.99. But, since it is rated for up to three years old, we will probably get A LOT of use out of this one.

Right to Left: Moon Chair, Go-Pod, Ciao! Chair, and a regular Walmart Adult Camp Chair

So, there you have it. Three pieces of interesting, stylish, and very useful camping furniture for your adventure kiddos! Check them out, and enjoy!

Crag Baby Gear Necessities

August 19, 2011 at 1:03 pm

When Mark and I announced our pregnancy, our family (and some friends) were quick to warn us about how our lives were “about to change forever!” and “so much for the rock climbing!” Well, our lives certainly have changed quite a bit, but we’re still getting out and rock climbing!

G is now almost 10 months old, and he’s already been climbing with us five times this summer. This doesn’t make us kids-in-the-wilderness experts, but we have found some gear that is extremely helpful. We love sharing tips to help everybody get out with their kiddos, so if you’ve got a little one at home or on the way, definitely check these out!

My boys in the mountains

1. Kid Comfort 2 by Deuter (http://www.deuter.com)

The first major hurtle in climbing with babies is actually getting to the crag. Well, the first hurdle is getting out the door, but I can’t help you with that. The second hurdle, then, is the approach. Your transportation setup can change depending on the approach requirements, but most of our crags are at least a short hike away. We picked up the Deuter at REI when G was six months old, and he’s probably spent 40 hours or more riding around in it since then. He’s really grown to like the backpack a lot, and Mark has almost gotten it adjusted perfectly for him.

When hiking to a climbing area, we usually have all of G’s stuff packed into the Deuter. It has a lot of extra storage under the seat, and then we’ll tie the PeaPod (see below) to the outside. Mark usually carries the baby, and I’ll slog up the trail with *everything else*, though I usually pawn the rope off on a friendly helper (aka over-encombered friend or unwilling accomplice).

So far, the Deuter has held up to a lot of use. It worked well even when he was a tiny baby, and has grown with him since. It has a lot of storage space, and is not too heavy. The pack adjusts through a large range, so I can carry G around in it as well (and I have the tiniest of torsos). The biggest problem we have with this pack is that it is tricky to get the baby into it. The clips on the harness are so low in front of the baby that you have to really shimmy and worm your hand down inside to get at it. And half of the clips are ‘adjustable’, which means they slide around on the webbing and you have to go digging for them every time you buckle your wiggly-one in.

Babe in the Woods

2. PeaPod by Kidco (http://www.kidco.com)

This little tent forms the center piece of our crag-side setup. It is a lightweight, but surprisingly large self-setting up tent (in other words, just let go and *whoomph* TENT). It comes with a little air mattress and pump, but we leave those at home. G naps pretty well in this, and he plays pretty well in it too. At the crag, he can nap zipped up inside, and I don’t worry about flies or mosquitos feasting on him. We’ve taken this to a lot of places where G needs a contained or protected play area, and it has worked out well.

It is not strong enough to work as a playpen, so if the baby is awake, they will need to be supervised. And it does not provide much shade by itself, so we bring blankets to lay on top of it, or look for shady places to set up. But it does, and I speak from experience here, protect your baby from ranging crag dogs, hungry bugs, and blustery desert winds.

Munchkin Formula Dispenser
3. Powdered Formula Dispenser by Munchkin (http://www.babiesrus.com)

While I do agree, breastfeeding is the healthiest option for our babies, not everything in parenting works out exactly as you might hope. For us less-milky moms, formula has some really nice perks at the crag. Instead of relying on a single set of boobs, anybody can give the baby his bottle, so mom can keep at the belay-slaving or proj-working all afternoon if she wants. Also, feeding baby his bottle does not require searching out a quiet, private spot for feeding. G can suck down a bottle while Dad yells beta from below with no problems. Finally, having formula on hand means I will not have to wrestle and squeeze my tiny boobs out from under my sports bra at all during the day, and this makes me happy.

It took us several outings to figure out our favorite method of formula storage and dispensing. But the system we have ended up with works great. We fill up a formula dispenser (as shown above) with measured six ounce servings of powdered formula. The powdered stuff does not require refrigeration or coolers, and can be left sitting in a pack all day. We also store six ounces of filtered, non-flouridaded, baby water in each of three bottles, with screw-top caps (like these), and pack a plastic baggie with the nipples and extra bottle parts. When G gets thirsty or tired, we just mix the powder into the measured water, shake, and serve!

Mark and G relax with a snack

If you are as crazy as I am, and worry about water sitting in plastic bottles all day long, we have found that Dr Brown’s glass bottles are VERY sturdy. They will add a bit of weight to the pack, but they hold up great to our climbing abuses.

Soy Genius Hoodie
4. Insect Shield Hooded Shirt by Soy Genius (http://www.rei.com)

The weather in the mountains changes quickly through the day, and I constantly struggle with the best way to dress G for our climate. In one day of climbing at 9000ft in Estes Park, we can go from 80’s in the sun to 30’s and snow on the hike out, so the best option for everybody is to pack layers. I have brought this lightweight Soy Genius shirt along with us on almost every outing so far. It is UPF rated 50, so blocks sun and keeps sunscreen usage down. It breathes well in warmer weather, and insulates nicely if there is a slight chill.

And the best part? The insect shield repellent is woven into the material, and from my testing, it does seem to work well. Soy Genius assures us that “Insect Shield® requires no re-application and cannot be swallowed; it’s not harmful to the eyes or skin and is appropriate for infants and pregnant/nursing women.” I am not sure what it is made from, but so far, the mosquitos and biting flies have left G alone while he wears it, and he has not developed any crazy side-effects.

So, the verdict on babies at the crag? Totally do-able! Especially with the help of some good gear, pre-planned organization, and helpful stuff-carrying, baby-entertaining, rope-gunning friends.

The Great Worn-Out Gear Challenge!

August 31, 2009 at 8:59 am

What is the most worn-out, beat-the-hell-up, torn-to-shreds, broken, scratched-beyond-recognition, threadbare, timeworn, used-well-past-reason-says-you-should piece of gear that you own?

I was looking for some missing slings in our “graveyard of gear” basement last week, and ran across these lovely items. They made me laugh at all of the hell we put them through, and I thought I would share them here.

Of course, Mark and I are not nearly the hardest climbers in the world, and we don’t stress gear the way the rest of you probably do! Let’s see some even better pictures of worn-out gear! Let’s hear the stories behind them! Post pictures or links in the comments!

Rope grooves worn into our top-roping biners, in less than 2 years!

Rope grooves worn into our top-roping biners, in less than 2 years!

Holes worn straight through the Petzl harness, took about 4 years

Rope groove worn into the side of the Reverso make the edge razor sharp after 4 years
Rope grooves make the edge of my Reverso razor sharp after 4 years

Camp Gear FAIL!

June 3, 2009 at 1:02 pm

Ever find that awesome new toy or must-have piece of gear, then get it out in the field and it not only doesn’t make your life more awesome, but, in many ways, sucks parrot caca? Well, Mark and I recently discovered that this happens to us far more than the average camper and climber. We seem to gather useless pieces of crap gear like pirates collect parrots… or something.

Anyway, I’d like to put together a short series of posts on what NOT to buy right now. Save yourself the pain and money, and don’t make the same mistakes we did.

Therm-a-Rest Compressible Pillow

ThermaRest Compressible Pillow - Advertised

A few years ago, I made camp pillows. I bought some heavy canvas and stuffed it with pillow filling. They were the right size, and I could throw them in the washing machine. But we need the BEST gear, and lumpy, old, homemade pillows just don’t fit in with our hi-tech, light-weight, uber-svelt climbing-gear persona.

I thought these Therm-a-Rest pillows were pretty great when we played with them at the store. They were filled with some kind of soft memory-foam-like substance that compresses when you roll the pillow, but slowly expands when left open. You don’t blow or pump them up, you don’t have to stuff them full of anything, and they were comfy when we laid on them in the store.

ThermaRest Compressible Pillow - Actual

We took them camping for three nights in Fruita, CO and three nights in New Mexico and I can officially say, these are a camp gear FAIL.

What happens to compressible foam when you lay your head on it all night long? That’s right, it compresses! It seems to take these pillows a full 24 hours to reach their full fluffyness, and a mere 2 hours of laying our fat heads on them to go right back to lumpy-pancake-state.

If you’re going camping, save yourself $30 and take the pillow off your bed. The Therm-a-Rest compressible pillows shown here: DEFINITELY not worth the money. FAIL!

Cam Re-sling

February 12, 2009 at 7:56 am

Reslung Cams

Last summer, there was a really unfortunate climbing accident due to old, worn-out slings on a route in Kentucky. It seems like there are one or two of these each year, and they are so sad because the accidents are preventable. Mark and I took the hint last summer and went through our slings and cordage, retiring the stuff we had been using since we first started climbing (eight years ago)!

We also went over our trad gear, much of which we bought all in one day with work bonuses during our second season of climbing. The cams were all in good shape, but many of the slings on them were not looking good. On a cam, the sling is a single point of possible failure, so it is dangerous to let it wear out too much.

Based on recommendations from BJ at Splitter Choss, we sent 24 cams off to Yates gear for re-slinging about two weeks ago, and got them back on Tuesday! Needless to say, the work was fast and professional. The new slings match the cams nicely, though the one orange TCU had to get a red sling. The price was good too, as getting all 24 cams reslung cost about $130 (less than a new rope!) Pulling the cams out of the box with the new slings was a wonderful treat, like I had just bought a whole new rack. Now, we’re both totally excited to get climbing and see the “new” cams out on the rock!

Mark and I have big plans for our REI dividend this spring, and we’re looking to replace a lot of gear that is showing wear these days (our harnesses have seen better days, the big belay biners have grooves worn in them, my helmet is cracked, etc) and I’m excited to upgrade to new, top-of-the-line safety gear as we do it. Look for more posts on new, shiny stuff this spring!!

Gear Every Climber Should Have – Buffs!

June 25, 2008 at 6:19 pm

I’ve been reading a lot of other climbing blogs lately, and I’ve found myself enjoying gear reviews more than I expected. It’s interesting to hear what people are using, and how they are using it, in a sport that we all enjoy. Let’s face it, half the fun of climbing is playing with gear. Ok, maybe more than half.

Also, I’ve noticed that many gear reviews are done by men, of men’s gear, for men in the outdoors. As a woman who climbs, hikes, mountaineers, mountain bikes, and otherwise thoroughly enjoys being active outside, I feel there is a derth of gear reviews for women. There is plenty of gear sold to women these days. Is it any better? Any worse? I’m hoping to address some of those issues with these posts.

DSC_2524

So, every other week or so, for as long as this holds my attention, I hope to highlight some piece of gear that we use on a regular basis, and talk some about it’s benefits to all climbers.

In this post, we’ll look at Buff Wear.

I am completely in love with this simple, very flexible, piece of clothing. It is a piece of coolmax (or one of several other types of stretchy fabrics) that is woven into a tube, about a foot long and seven inches in diameter. I do a lot of trad climbing, and in that mindset, I like all of my gear to serve several purposes. The buff does a great job with that.

DSC_1285

Generally I, and many of my friends now, use the Buff as some form or another of hair containment unit. This can be done as a headband, sweat band, bandanna or head rag. The best part of a buff over traditional headwear is the lack of a seem. So, if you wear this thin piece of fabric all day under your climbing helmet (and you should be wearing a helmet!) you won’t get one of those obnoxious red lines from the seam pressing against your forehead all day. Neither will the buff shift due to a knot interfering with your helmet: no knots!

But, as I mentioned, it comes in handy for many other uses. It can cover cold ears easily. I often do the inside-out plus one twist move to get a little skull cap that I can wear to warm up on chilly mornings. In the winter, I usually use my buff as a scarf or light balaclava while skiing or snowshoeing. Mark made very good use of a buff after shaving his head last weekend. And if you’re skinny enough (as seen on Survivor) you can wear the thing as a loincloth/tube top.

DSC_6301

My only complaint about the Buffs is that they can be a little expensive. It might seem to silly to drop $20 on a tube of stretchy fabric, but mine have lasted years and been totally worth the investment. Also, there now seems to be about a million options available. Winter buffs, shorter buffs, high UV buffs, and reflective kid-sized buffs. Specialization is never good for a product that’s main strength is its versatility.

But the Original Buffs are still available in almost every outdoors store. If you want to see the full range of options (with an astounding number of patterns available), check out the Buff Megastore. I’ve bought from them before and always been happy with the transaction. If you are an REI member, they are available through them as well.

Buffs! Approved by Kate for everybody.